Many of us dream about having a well stocked and organised pantry full of products, ready to prepare delicious meals. But how many times have you looked into your kitchen cupboard and couldn’t find the thing that you were looking for? The best way to make sure you know what products you have in your pantry is to store them in labelled containers. Sure, you could buy labels and tags, but why not try making them yourself? That way you can make the labels look just the way you like. Check out the easiest way to make food labels and stickers on Microsoft Word and Google Docs.
Go to the tutorial for:
This tutorial will be great for everyone who loves to make his own pickles. Want to know more about pickling? See our article “Learn All About Making Pickled Foods At Home” or join the group on Facebook.
Get organised!
Whether you have a large walk-in pantry or you store your food in kitchen cupboards, getting them organised is the best way to make sure you can find everything and stop food from expiring in the back row.
The first step to make sure your pantry is organised is to store all your food products in sealed containers, like jars or hard plastic tubs. This will keep your food fresh for longer and make it much easier to organise your pantry.
Make your own food labels and stickers in Microsoft Word
After you’ve stored your food in containers, it’s time to make some labels. Microsoft Word is the easiest program you can use to design your labels. You can choose to have the same style and colours for all your products or make different designs for each shelf or food type.
All you need to make food labels is your computer with Microsoft Word, a printer, and your own imagination.
Design the shape of your label
Creating food labels in Microsoft Word is very simple. First of all, start by thinking about what designs you prefer. Pick a shape for your labels. Some people like simple square labels while others go for round ones, the choice is all yours!
How to do it? Open a new Word document and click the “Insert” tab, select “Shapes”, and then choose which one suits the style of label you’re going for.

Choose size and colours
You can adjust the size of your food labels to suit your preferences. To adjust the size of your label, just follow the ruler on each side of the Word page as you click and drag the corners of your shape. You can also type in the desired size of your labels on the right side of the menu bar.

The next step is a bit more fun – designing the colours of your labels. Microsoft Word lets you choose different colours and thicknesses for your shape’s outline. You can also fill your label with a background colour, gradient or any picture that you choose from your computer.

Using just one plain colour is a good solution for simple, classic labels, but it’s not the only option. You can choose different backgrounds for your labels by adding stylish patterns. You can also find many patterns online. How to add patterns and pictures to your food label? First, save the image you want to use on your computer. Then click the paint bucket option, select ‘Picture’, and find the pattern you want to use from your computer.

Make a nice patterned frame for your label
You can use your chosen pattern as a background for your text, but you can also add another layer to your label and easily create a nice patterned frame. To do so, you need to add another shape and place it on top of the one you’ve already created.
Just like before, simply click ‘Insert’ and choose ‘Shape’ again. Place this shape on top of your first shape with the pattern, and resize it to be a little smaller. This way you will have created a nice frame with a pattern and a clear space to put your text on.

You can choose the same shape as the previous one for your top layer, or you can add a different shape just to make it more interesting. To make sure you can easily read the text on your label, we recommend picking plain and simple colours for your second shape. It can be white or black or any colour you decide.
You can also play a bit with the outline of your shapes, for example, changing the thickness, style, or colour.

Your smaller shape can be outlined with straight lines, dashes, or even sketched lines for a more modern look. You can also adjust the thickness of your outline by clicking “Weight” on the outline option.
If you like, you can make the same changes to your larger, patterned shape. You need to remember, however, that the bottom shape will be the border of the whole label – so some sketched lines may be difficult to cut out after printing. Therefore it’s easier to go with straight lines for the bottom shape.
Write text on your label
If you prefer to write the name of your labelled product by hand, you can skip this step. Your new label is almost ready. But if you want to print each product’s name, then this is the moment to do it!
This step is just as easy as all the previous ones. You have two different options you can choose:
Option 1.
Insert a Text Box
To insert text on your label, you need to come back to the “Insert” button you now know and love. This time, choose the “Draw Text Box” option.

Place your arrow on the top layer and drag the text box over it. This way, the text you write will only appear inside the text box you’ve created. Remember to make your text box transparent and without any background. To do so, double click on your text box, select ‘Shape fill’, and choose the “No fill” option.
After this is done, you can start typing the name of the product you want to label. You can also play around with the font, colours, and letter size by using the basic typing menu, just as you would with any other text you type on Microsoft Word.

Option 2
Insert WordArt
The second option is also pretty easy, as you’ll be inserting text with a pre-designed style in the Microsoft Word program. To do this, simply click “Insert” and choose the “WordArt” icon. This will show you different styles of text.

After choosing the option you prefer, you will see an example text at the beginning of your document.

Don’t worry about the size of WordArt you’ve picked, you can adjust that easily. Now, write the name of the product you are labelling and drag the text inside the label (on the top of your smaller shape).

You can change the style and colours of your text on the WordArt options (double click on the WordArt text to see the options). On the basic menu, you can also change the font and size of your text.
Connect all elements together
Once you are happy with the look of your label, it’s time to group all the layers together and use it as one shape. This will make it easier to move your label around the document without accidentally adjusting any of its layers.
To group all the elements, click on each layer of your label while holding the “Ctrl” button on your keyboard. Then click the right button of your mouse. Choose the “Group” option on the menu bar.

After that, you can move your label as one shape and copy it as an entire design. Don’t worry, you can still make some changes to your label after that by double clicking on the layer you want to change.
Duplicate your label
If you have many different products you’d like to label, simply copy your label and place the new one next to it. Change the name of the product, add another label, write a new product name, and continue until you’ve named all your labels.

Remember to place your labels close together so you can fit many on one page, but still leave some space between them to make it easier to cut out after printing.
Divide your labels
If your labels are square, you can add a thin line between them to make sure you cut the paper straight when printed. You can do that by clicking “Insert”, selecting “Shape” and choosing the line option.

Place your line on the edge of your labels or close to your labels. If you’d like to keep a bit of white space outside the label, place your line close to it rather than on the edge. You can do the same thing using vertical lines. This way you can easily cut your labels without the risk of slipping your scissors and making the page uneven.

Play with your designs
If you like your design but want to group different products in your kitchen cupboards, you can assign different colours or patterns to make each group easily distinguishable. You can do this by changing the text colour or making small colour changes to your pattern, without having to build a whole new label.
If you want to change the colours of your patterned frame, double-click on the pattern on the label you want to change, and choose “Format Pane” on the menu. Choose the icon that looks like a picture.

Select “Picture Colour” on the menu. Here you can adjust Colour Tone and Saturation yourself, or click on “Presets” and choose a preselected shade that you like. This way, all your labels will have the same pattern design, but their shades will differ slightly depending on the food group.

Using this option you can assign different shades to different types of products in your pantry, making your cupboards a lot more colourful and interesting.

Let’s print it!
And there you have it! Your labels are ready! Now all you have to do is print them. You can use normal paper and stick your labels to the containers with double sided sticky tape. You can also laminate your labels after printing if you want to keep them nice and clean. Another option is to buy sticker paper that you just pop into your printer and print on. If you do go for sticker paper, make sure you choose the type without pre-cut sticker shapes. Otherwise you’ll need to adjust the position of your labels in the document to fit inside each sticker, which can be a little complicated sometimes.
Organise your pantry
Once you’ve printed your labels, cut them out and stick them on your containers. You can now start designing your pantry space! Group your different products together as you’d like them – you can group foods by type (e.g. spices, pasta, flours) or use different colours on different shelves. With your new organised pantry, it’ll be easy for you and your family members to know where to put products back after using them.
Make your own food labels and stickers in Google Docs
Have you ever tried the Google Docs platform? The online space allows you to easily create Word documents from your browser. You can edit documents, share them with others, and notify friends or colleagues to comment or make changes. Even better, your files are stored on the Google server so you can reach them anytime you want, from any device. All you need to do to access them is log in to your Google account.
You can find Google Docs by logging into your Google Account. After signing in, just click on the square looking icon next to your account photo/icon. This will show different platforms you can access, like Google Photos or Google Drive. When you scroll a bit down, you’ll see the ‘Docs’ option, and this is what you need to choose.

Design the shape of your label
Creating food labels using the Google Docs platform is very simple. First, you need to create a blank document by choosing the ‘Blank’ option on the top of the site.
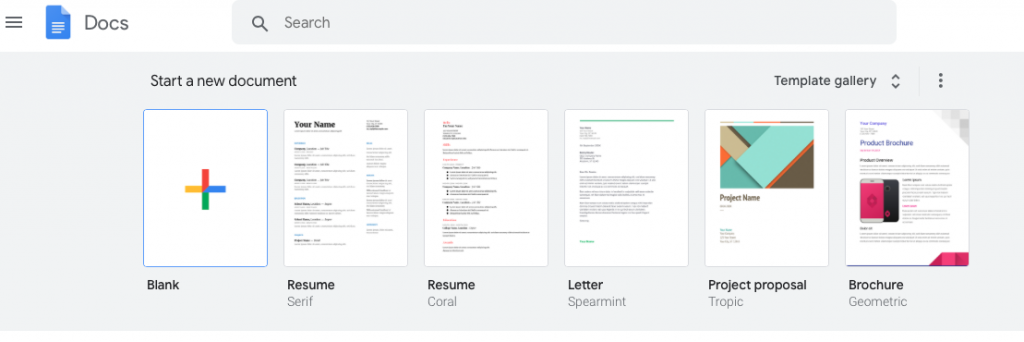
And now we can start our label making process! Start by thinking about what designs you prefer. Pick a shape for your labels. Some people like simple square labels while others go for round ones, the choice is all yours!
How to do it? Click the “Insert” tab, select “Drawing”, and then the option “New”.
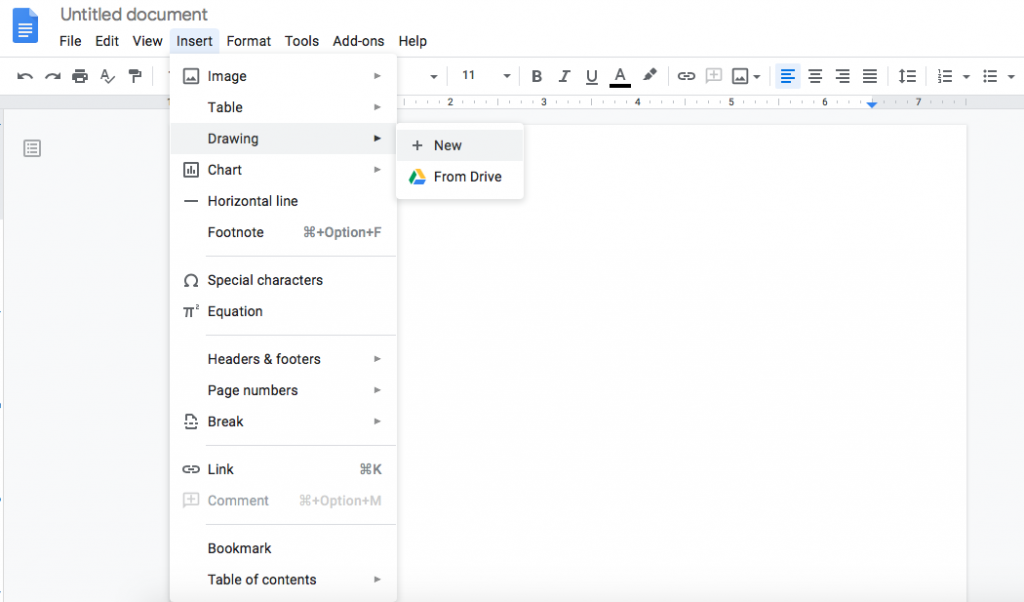
A window will pop-up showing you options for drawing lines, adding images etc. Click the icon with the shapes to see all the available shape options. Then you can choose a shape that you’d like for your labels.

Choose size and colours
After choosing your shape, stretch it along the checkered background to change its size. You can adjust the size of your food labels to suit your preferences. To adjust the size of your label, just follow the ruler on each side of the page as you click and drag the corners of your shape.
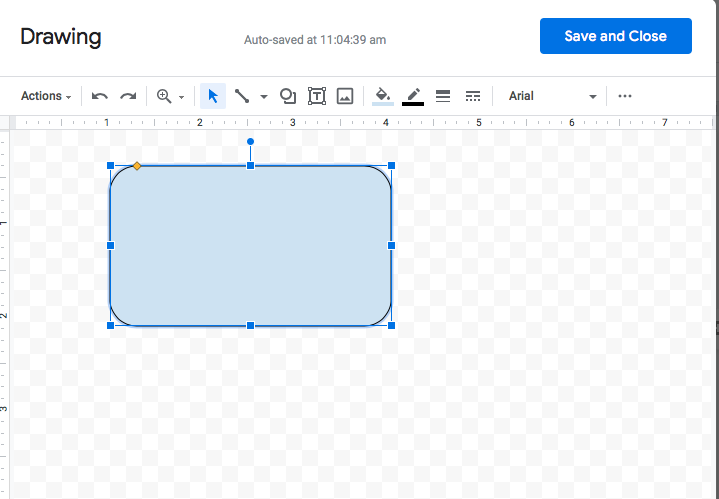
The next step is a bit more fun – designing the colours of your labels. Google Docs lets you choose different colours and thicknesses for your shape’s outline. You can also fill your label with a background colour or gradient.
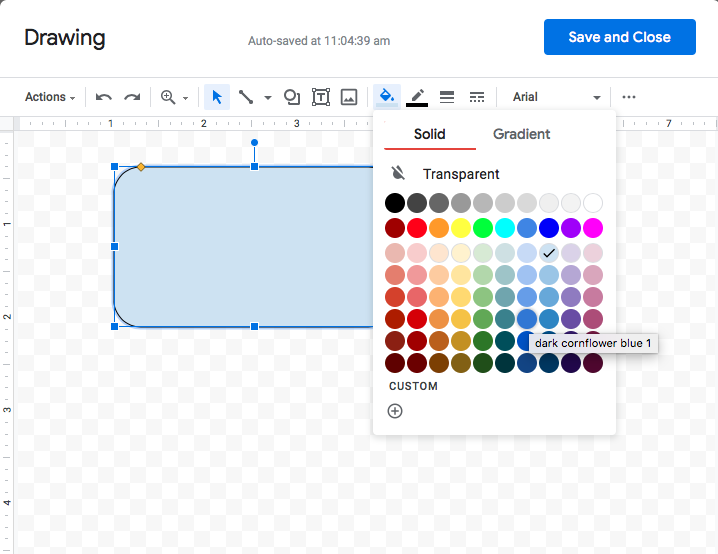
Using just one plain colour is a good solution for simple, classic labels. You can choose from many available colours or click on the ‘custom’ option and create your own shade of colour.
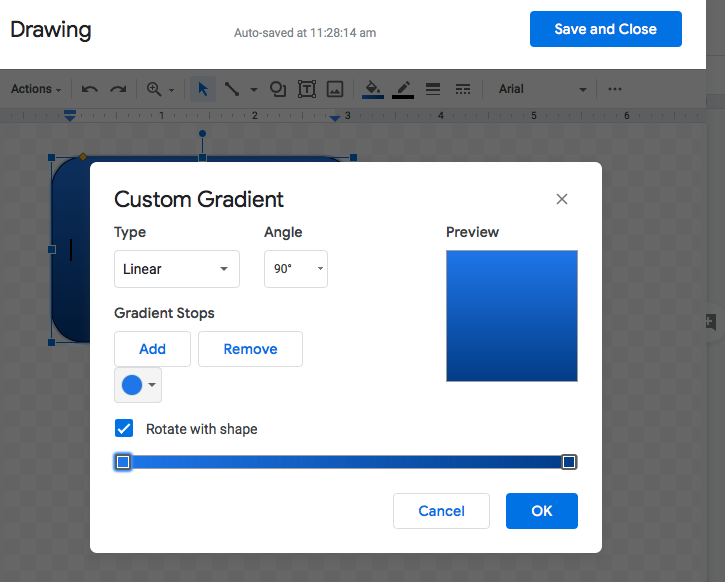
If you want to fill the background of your label or sticker with a gradient, choose the ‘gradient’ option on the colour tab. You can then decide what type of gradient you prefer and what colours to use.
Make a nice frame for your label
This can be the background of your label or sticker, creating a nice colourful frame around the edges. To do this, you need to add another shape and place it on top of the one you’ve already created.
This can be done in the same editing window of your first shape. Just like before, simply choose ‘Shape’ again. Place this shape on top of your first colourful one, and resize it to be a little smaller. This way you will have created a nice frame with the colour and a clear space to put your text on.
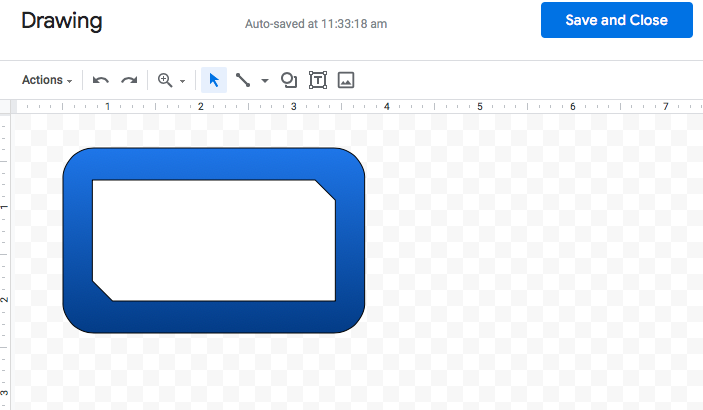
You can choose the same shape as the previous one for your top layer, or you can add a different shape just to make it more interesting. To make sure you can easily read the text on your label, we recommend picking plain and simple colours for your second shape. It can be white or black or any colour you decide.
You can also play a bit with the outline of your shapes, for example, changing the thickness, style, or colour. This all can be done in the editing window when you select each shape.

Your smaller shape can be outlined with straight lines or dashes for a more modern look. You can also adjust the thickness of your outline by clicking the lines on the drawing menu.
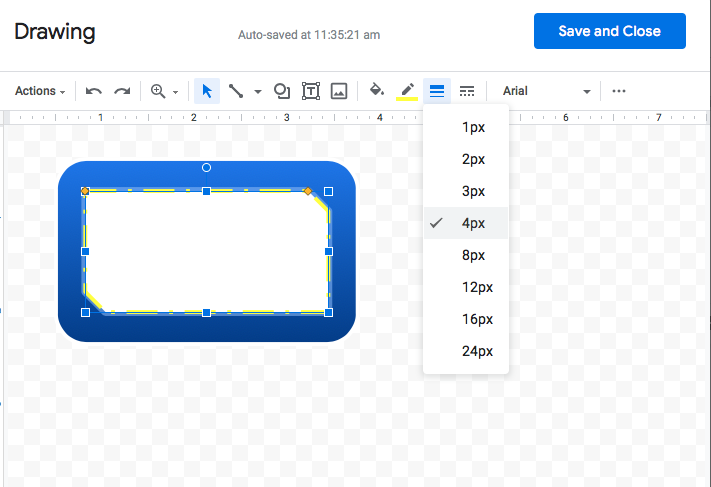
If you like, you can make the same changes to your larger, coloured shape. You need to remember, however, that the bottom shape will be the border of the whole label – so some more complicated lines may be difficult to cut out after printing. Therefore it’s easier to go with straight lines for the bottom shape.
Write text on your label
If you prefer to write the name of your labelled product by hand, you can skip this step. Your new label is almost ready. But if you want to print each product’s name, then this is the moment to do it!
This step is just as easy as all the previous ones. You have two different options you can choose:
Option 1.
Insert a Text Box
To insert text on your label, you need to simply add another layer in this editing window. Click the “Text Box” icon and stretch it over the top layer, right where you want your text to be placed.
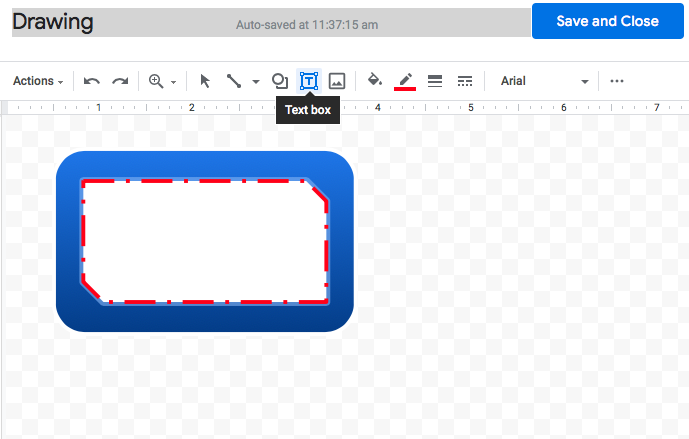
This way, the text you write will only appear inside the text box you’ve created. Remember to make your text box transparent and without any background. To do so, click the colouring options of the Text Box that are available on the top toolbar of the editing window.
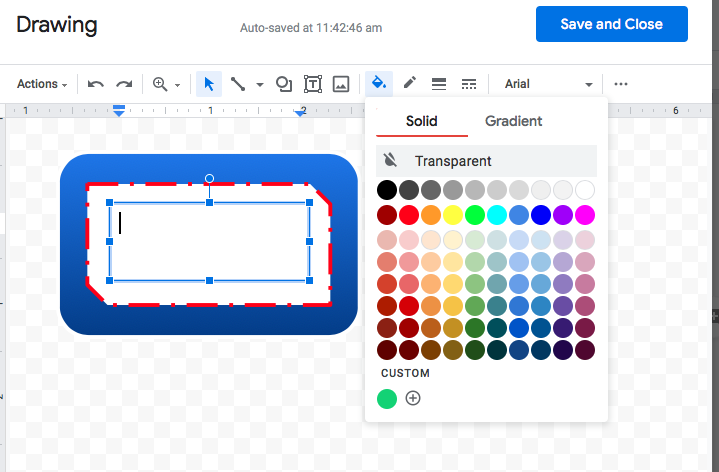
After this is done, you can start typing the name of the product you want to label. You can also play around with the font, colours, and letter size by using the typing menu on the top toolbar of the drawing window.

You can also adjust the position, size, and style of your text by clicking on three dots on the right side of the top toolbar. This will open a small menu with text editing options.
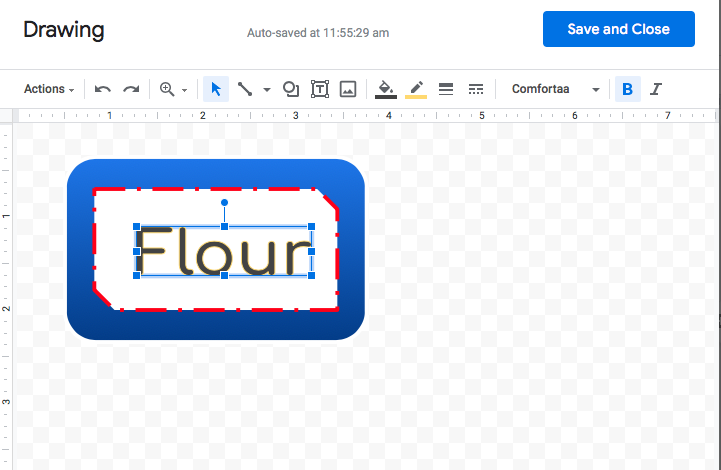
Option 2.
Insert WordArt
This is another easy way to add text to your label, using a pre-designed style from the Google Docs platform. To do this, simply click the “Actions” button on the left side of the toolbar and choose “WordArt”.
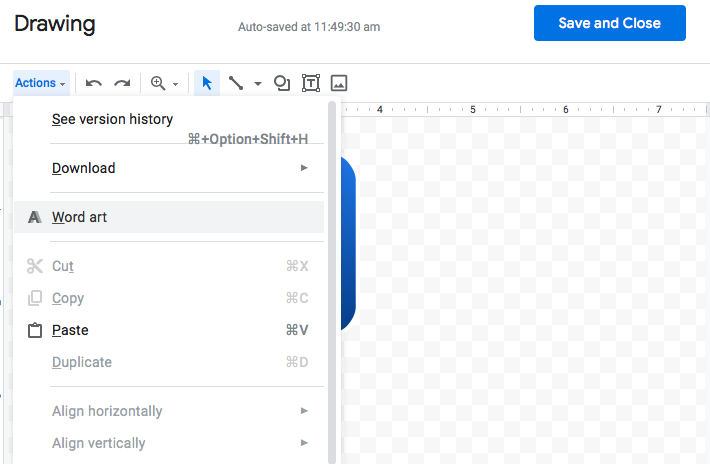
After that, you’ll see a small window. Here you can write the name of your product for the label and then click Enter.
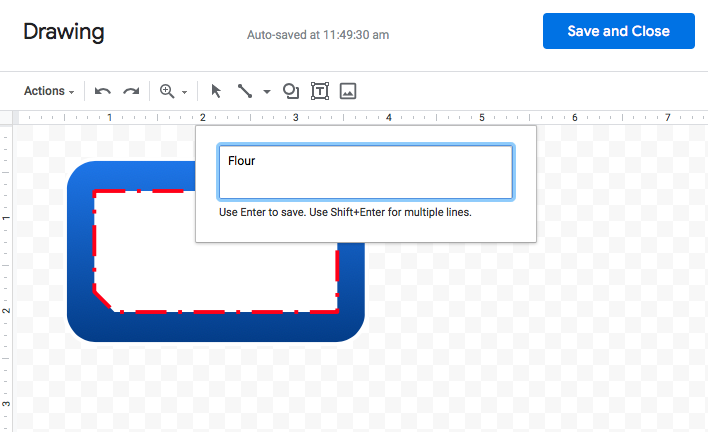
After accepting the text, you will see large letters with a Google Docs design, however you can change this as you please by using the options available on the top toolbar.
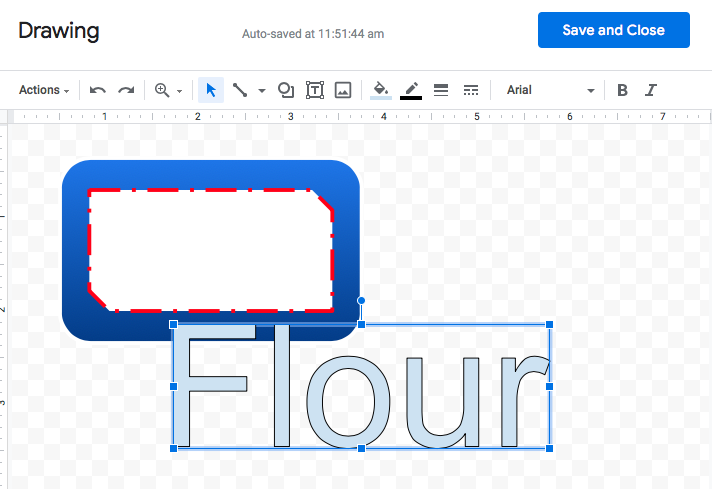
You can also use the top editing menu to change the colour, font, and style of your text. After you’re finished editing, you can place your text on top of your label.
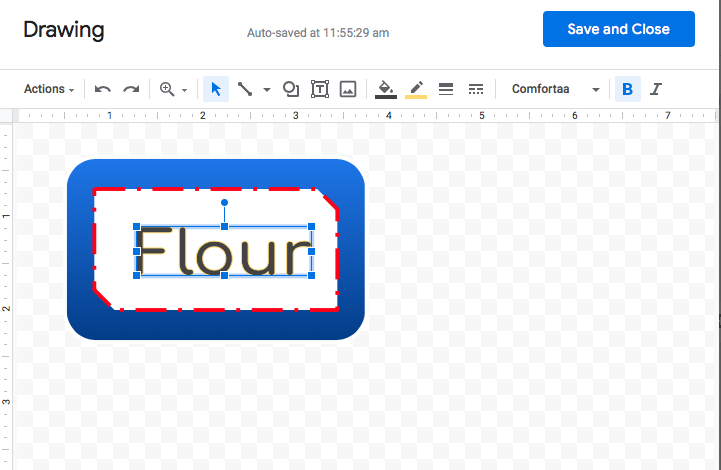
Connect all elements together
Once you are happy with the look of your label, it’s time to group all the layers together and use it as one shape.
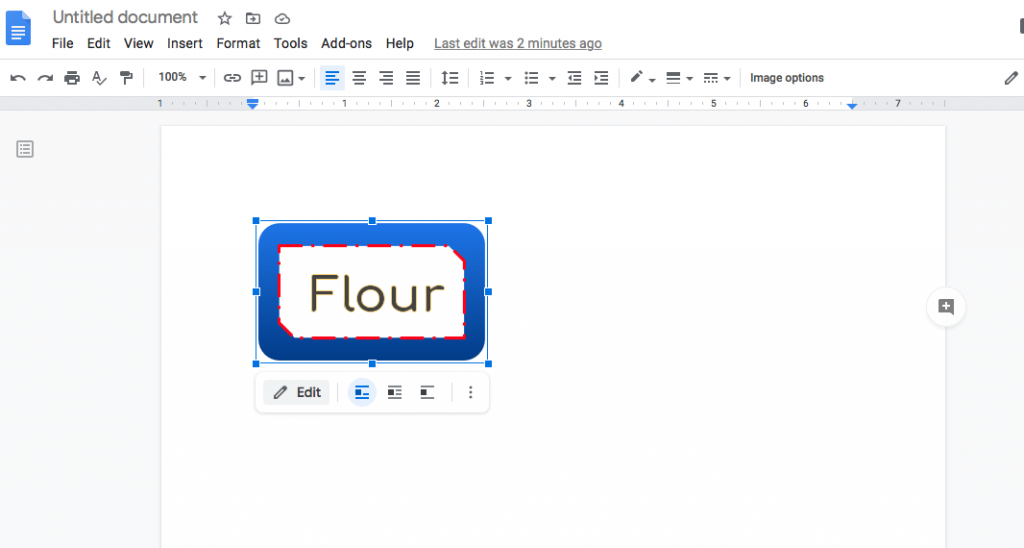
To group all the elements, simply click the “Save and Close” button on the top right corner. After that, you will be taken to the document page and your label can be used as one shape.
Now you can move your label as one shape and copy it as an entire design. Don’t worry, you can still make some changes to your label after that by double-clicking on it or choosing the “Edit” option under the chosen label.
Duplicate your label
If you have many different products you’d like to label, simply copy your label and place the new one next to it. Change the name of the product by clicking each label and editing the text in the label window. Add another label, write a new product name, and continue until you’ve named all your labels.

Play with your designs
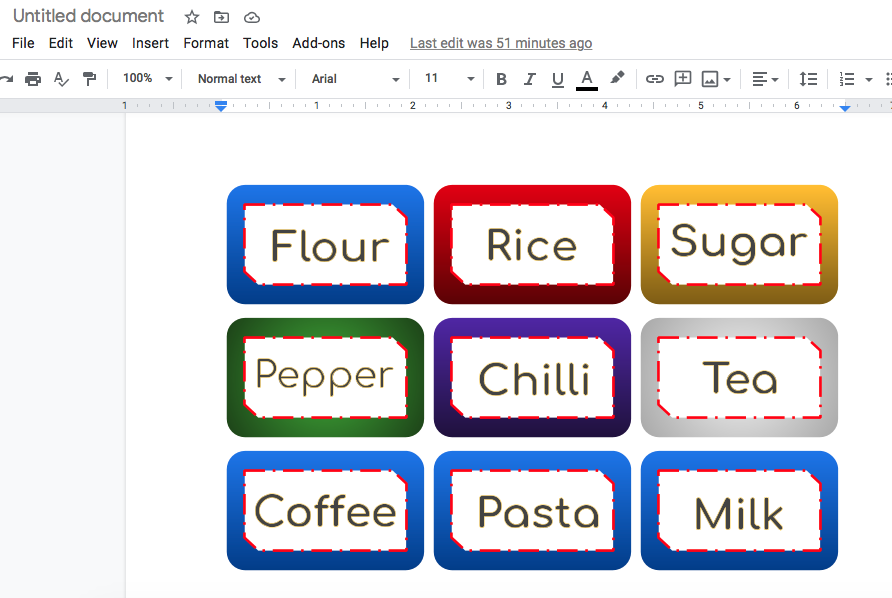
If you like your design but want to group different products in your kitchen cupboards, you can assign different colours to make each group easily distinguishable. You can do this by changing the text colour or making small colour changes to your frame colour, without having to build a whole new label.
If you want to change the colours of your frame, double-click on the label you want to change. Once the editing window is open, click on the coloured layer and change the colour on the top toolbar.
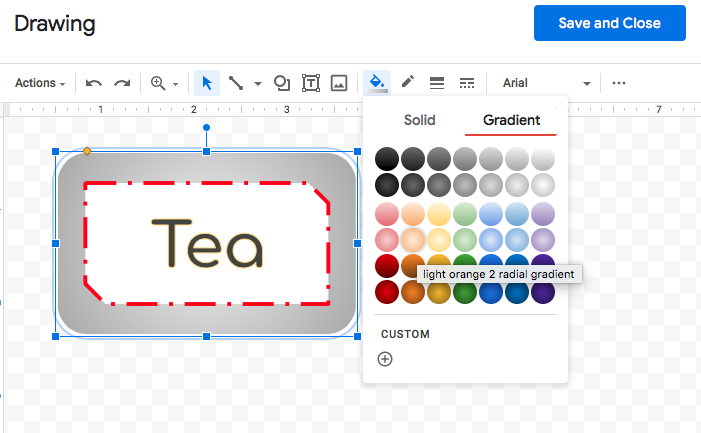
This way, all your labels will have the same style, but their colours or shades will differ slightly depending on the food group.
Using this option you can assign different shades to different types of products in your pantry, making your cupboards a lot more colourful and interesting.
Let’s print it!
And there you have it! Your labels are ready! Now all you have to do is print them. You can use normal paper and stick your labels to the containers with double sided sticky tape. You can also laminate your labels after printing if you want to keep them nice and clean. Another option is to buy sticker paper that you just pop into your printer and print on. If you do go for sticker paper, make sure you choose the type without pre-cut sticker shapes. Otherwise you’ll need to adjust the position of your labels in the document to fit inside each sticker, which can be a little complicated sometimes.
Organise your pantry
Once you’ve printed your labels, cut them out and stick them on your containers. You can now start designing your pantry space! Group your different products together as you’d like them – you can group foods by type (e.g. spices, pasta, flours) or use different colours on different shelves. With your new organised pantry, it’ll be easy for you and your family members to know where to put products back after using them.
People found this article by searching terms like:
- make your own food labels
- food label template
- food label stickers
- how to make a food label in word


Bookmarked! But do you have a Youtube video for this one? Would’ve been great to also watch how this goes on video.